


Your MacBook is more than just a laptop – it reflects your style, personality, and creativity. While Apple's sleek aluminum design is iconic, many users want to personalize their MacBook. This is where MacBook laser engraving comes in.
By engraving permanent and precise designs onto the surface of your MacBook, you can transform your device into a truly personalized masterpiece. From simple text and logos to detailed artwork, laser engraving on MacBook offers a unique way to show individuality without compromising functionality.
In this guide, we explain what MacBook laser engraving is, how it works, what tools you need, safety precautions, and creative ideas to inspire your own customization.

In this article:
- Part 1: Overview of MacBook Laser Engraving
- 1.1 What is MacBook Laser Engraving?
- 1.2 How Does Laser Engraving Work on a MacBook?
- 1.3 Which Engraving Machine is Best for MacBook Engraving?
- 1.4 Safety Precautions Before Engraving a MacBook
- Part 2: Why Use a Laser to Personalize Your MacBook?
- Case Study: How to Personalize a MacBook with Laser Engraving in 5 Steps💡
- Part 4: Step-by-Step Guide to MacBook Laser Engraving
- Part 5: FAQs about MacBook Laser Engraving
Part 1: Overview of MacBook Laser Engraving
1.1 What is MacBook Laser Engraving?
MacBook laser engraving is the process of using a focused laser beam to engrave text, patterns, or images directly onto the aluminum casing of a MacBook (Apple also offers this service when purchasing a new device). This method delivers permanent, high-precision results without the need for stickers, paint, or adhesives. The engraved surface becomes part of the MacBook and is particularly durable and resistant to fading or peeling.

1.2 How Does Laser Engraving Work on a MacBook?
Laser engraving works by directing a concentrated beam of light onto the anodized aluminum surface of the MacBook. The laser removes the top oxide layer with pinpoint precision, revealing a high-contrast design underneath. The process is controlled by computer software, allowing even detailed graphics, logos, or fine text to be consistently and cleanly reproduced.
1.3 Which Engraving Machine is Best for MacBook Engraving?
For engraving a MacBook, a fiber laser engraver is the most effective choice. Fiber lasers are specifically designed for metals like aluminum and offer superior precision and speed compared to diode or CO₂ lasers. They enable sharp, detailed engravings without damaging the MacBook's structure. A high-quality fiber laser with adjustable parameters is recommended for professional applications or small businesses.
For home or small projects for MacBook laser engraving, fiber laser engravers like LP5, LP4, or even LP3 are recommended. These MacBook laser engraving machines are user-friendly and cost-effective.

1.4 Safety Precautions Before Engraving a MacBook
Since a MacBook is an expensive and delicate electronic device, some safety measures are important:
- Proper Ventilation: Engraving anodized aluminum can produce fumes – ensure a well-ventilated workspace.
- Protective Equipment: Always wear appropriate laser safety glasses for your machine.
- Test Settings: Perform a test on a piece of scrap aluminum to adjust power and speed before engraving the actual MacBook.
Part 2: Why Use a Laser for MacBook Engraving?
Laser engraving has become one of the most popular methods for customizing MacBooks – and for good reason. Unlike stickers, skins, or printed foils that can peel or fade over time, laser engraving creates a permanent design that becomes part of your MacBook's aluminum casing.
① Precision and Detail
Laser technology allows for incredibly fine details, so everything from simple text to complex logos or intricate artwork can be engraved. The results are sharp, clean, and consistent across the entire surface.

② Durability
Since the engraving alters the anodized aluminum surface of the MacBook, the design is scratch-resistant and will not wear off with daily use. This durability makes engraving ideal for long-term personalization or branding.
③ Professional Appearance
Laser engravings create an elegant, high-quality look that perfectly matches the premium design of the MacBook. Whether for personal customizations or corporate branding – the result looks polished and professional.
④ Versatility
Laser engravings are equally suitable for individuals, businesses, and organizations. You can personalize your MacBook with names, inspirational quotes, or artwork – or add logos for corporate use, promotional gifts, or employee equipment.
⑤ Environmentally Friendly Customization
Unlike chemical etching processes or ink-based methods, laser engraving is a clean and environmentally friendly process. It requires no inks, solvents, or adhesives, thus reducing environmental impact.
Case Study: How to Engrave a MacBook in 5 Steps💡
Preparation Checklist for MacBook Laser Engraving:
- Material to Engrave: MacBook
- Engraving Machine: Fiber Laser Engraver
- Design for Engraving: Name, logo, images, patterns, etc.
Can you engrave a MacBook? Yes! The process is straightforward. So, how long does it take to engrave a MacBook? Don't worry – just follow these 5 simple steps to get your MacBook laser-engraved in minutes!
Step 1: Prepare the Design
Start with the artwork, logo, or text you want to engrave. Use vector files (like SVG or AI) for the best results, although most engraving programs also support images and text. Fine lines and high-contrast designs work best on anodized aluminum.
Step 2: Select the Right Laser Engraving Machine
We recommend LaserPecker 4 (LP4), equipped with a 10W 450nm diode laser, 2W 1064nm IR laser, and a speed of up to 4,000 mm/s, ideal for MacBook engravings.
Step 3: Position and Secure the MacBook
Clean the aluminum surface of the MacBook with a microfiber cloth to remove dust, oils, or residue. Place the MacBook flat in the engraving machine and secure it firmly to prevent movement during engraving.
Step 4: Set Up the Engraving Machine
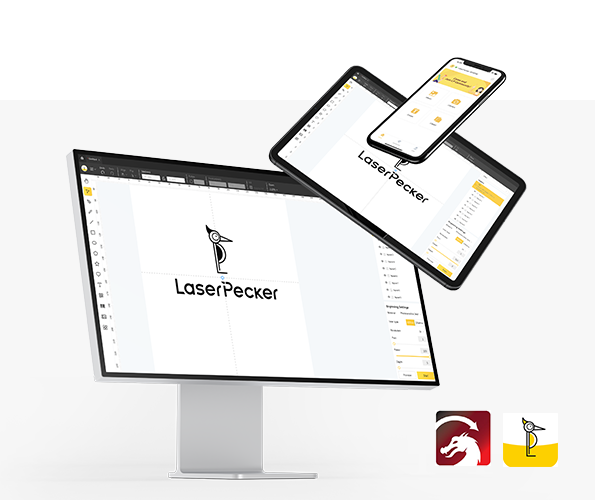
Use the LaserPecker Design App/Software or other graphic programs like Photoshop to create or import the desired design onto the MacBook surface. Consider size, shape, and other details.
*You can also visit LaserPecker CraftZone to get inspiration or purchase files online.
Now it's time to adjust the laser engraving parameters:
First: Make sure your engraver is turned on and connect it to your computer or mobile device via the appropriate interface (WiFi, USB, Bluetooth, etc.).
Second: Open the LaserPecker Design Space and upload your design (JPG/PNG/G-Code/SVG etc. are supported).
Third: Place the material in the designated work area, activate preview mode, and check the laser focus.
Fourth: Check if your design is correctly positioned on the MacBook surface. Adjust size and position if necessary.

Finally: Access the software's laser settings to adjust parameters such as power, speed, and resolution according to the MacBook's properties and the design's level of detail. You might be wondering: "What laser power is needed for MacBook engraving?" Don't worry, we have the right settings!
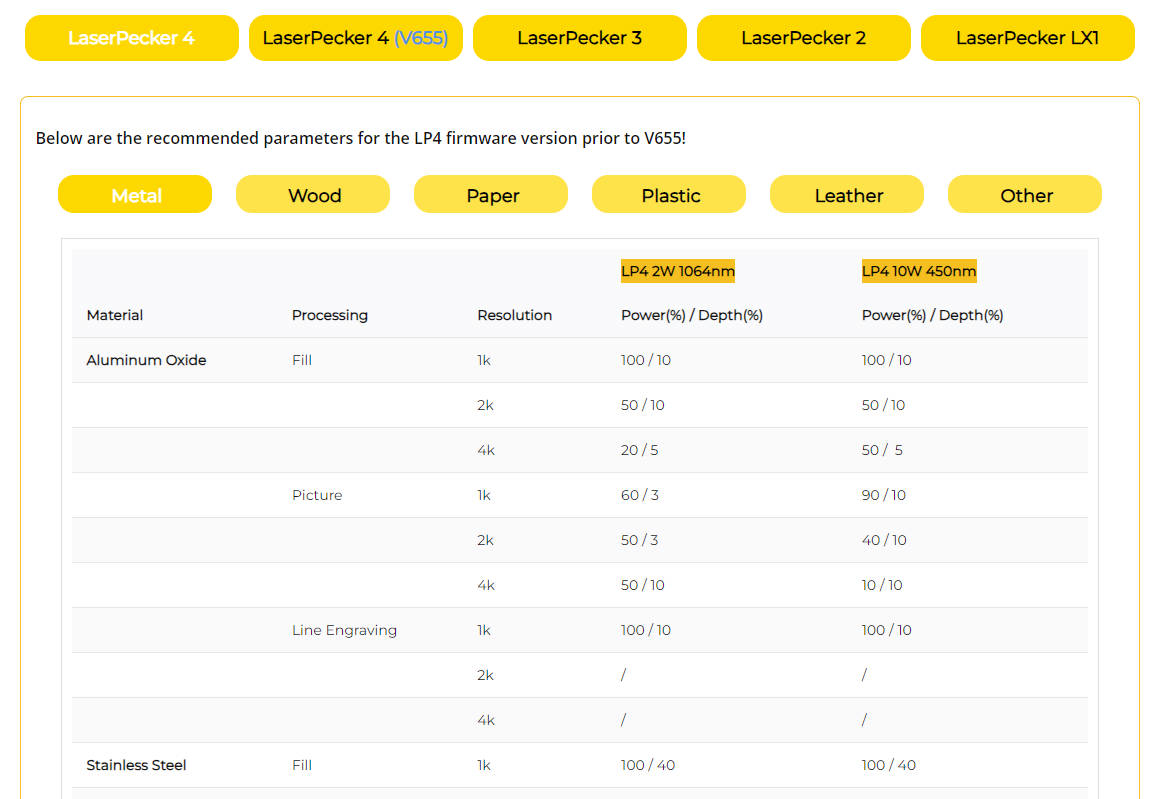
For optimal results, the recommended LaserPecker LP5 material settings are: 2W 1064nm IR laser; Resolution: 4k; Power: 60%; Depth: 1%; Passes: 1.
When operating the laser engraving machine, you should use safety glasses or a laser shield to protect your eyes and body from potential harm from the blue laser.
Also, be aware that smoke or toxic gases may be produced during engraving. Wearing a mask or using an air purifier is therefore recommended.
Further recommended LaserPecker engraving and cutting parameters for LP1, LP2, LP3, LP4, and LP5 can be found in the corresponding table.
Step 5: Start Engraving Your MacBook Now
Double-check everything to avoid errors. Then press the start button and watch the laser bring your design to life. Keep an eye on the process – and everything is done!
After engraving, gently clean the surface with a soft cloth to remove any residue. Check that all details have come out clean and sharp. Your MacBook is now permanently personalized and professionally engraved.

Part 4: Step-by-Step Guide to MacBook Laser Engraving
Laser engraving opens up countless possibilities for personalizing your MacBook. Here are some popular ideas for inspiration:
1. Minimalist Text Engravings
Add your name, initials, or a favorite quote in an elegant font – for a simple yet professional look.
2. Custom Artwork
Engrave complex patterns, mandalas, or abstract designs to make your MacBook truly unique.
3. Logos and Branding
Ideal for professionals and businesses who want to showcase their brand identity on their devices.
4. Pop Culture Icons
Showcase your favorite movie characters, game art, or anime designs.
5. Functional Engravings
Add contact information or QR codes for quick identification if your MacBook is lost.
Part 5: FAQs about MacBook Laser Engraving
1. Does laser engraving void my MacBook's warranty?
In most cases, yes. Since engraving physically alters the surface of the MacBook, Apple's warranty may exclude issues in the engraved area. Always check this beforehand.
2. Can laser engraving affect my MacBook's functionality?
No, if done correctly. The engraving only affects the anodized aluminum surface and does not impact internal components.
3. What type of laser is best for MacBook engraving?
A fiber laser is generally the best choice for engraving anodized aluminum, as it delivers precise and durable results.
4. Can a laser engraving be removed or reversed?
Laser engravings are permanent. The only way to alter them is to rework or replace the MacBook's casing.
5. How long does MacBook laser engraving take?
Depending on the complexity of the design, an engraving typically takes between 1 and 5 minutes.
Conclusion
Laser engraving a MacBook is more than just decoration – it's a way to express your personality while adding value to your device. Whether you engrave your initials for a professional touch, your company logo for branding, or detailed artwork for creative design – the results are precise, durable, and unique.
With the right machine, careful preparation, and a little creativity, you can personalize a MacBook that reflects your identity. Although engraving is permanent, it is precisely this permanence that makes it special – ensuring that your design lasts as long as your MacBook itself.
If you want to personalize your MacBook with a distinctive look that no one else has, laser engraving is the perfect solution.


