


You've just bought a new pair of AirPods – sleek, compact, and technologically advanced. But why settle for ordinary when you can truly make them your own?
With laser engraving on your AirPods, you can have names, logos, designs, or personal messages engraved directly onto the AirPods case. Whether for your own use, as a unique gift, or for branding purposes – laser engraving is the perfect way to personalize your AirPods.

This article contains:
- Part 1: Overview of AirPods laser engraving
- 1.1 What is AirPods laser engraving?
- 1.2 How does laser engraving work on AirPods?
- 1.3 Which engraving machine do you need for AirPods?
- Part 2: Why use lasers for AirPods engraving?
- Case study: Laser engraving of AirPods in 5 steps💡
- Part 4: Safety & Tips for Laser Engraving AirPods
Part 1: Overview of AirPods laser engraving
1.1 What is AirPods laser engraving?
AirPods laser engraving is the process of using a precise laser beam to engrave text, logos, or custom designs directly onto the AirPods case (Apple also offers this service when you purchase a new device ). Laser engraving creates a permanent, professional mark that makes your AirPods unique. This is ideal for personalizing your device, creating memorable gifts, or even for in-store branding.

1.2 How does laser engraving work on AirPods?
Laser engraving involves directing a focused laser beam onto the smooth surface of the AirPods case . The laser removes a very thin layer of material to create the design without damaging the device itself. Because it is a non-contact process, there is no risk of scratches or dents. The precise control allows even small text or intricate designs to be clearly engraved, resulting in a clean and durable finish.
1.3 Which engraving machine do you need for AirPods?
To engrave AirPods safely and effectively, you need a desktop laser engraver capable of marking plastic or metal surfaces, depending on your AirPods model. Key features include:
- High precision required to machine the small dimensions and fine details of the AirPods.
- Non-contact engraving to avoid scratches on the case.
- User-friendly software for easily uploading and customizing designs.
- Safety features such as protective housing and ventilation are necessary, as fumes can be produced during engraving.
For home or small AirPods laser engraving projects, diode laser engravers like the LP5 , LP4 , or even LP3 are a good choice. These AirPods laser engraving machines are easy to use and cost-effective.

Part 2: Why use lasers for AirPods engraving?
Laser engraving is the ideal method for personalizing AirPods because it offers precision, durability, and flexibility—qualities that other methods cannot match. Here are the reasons why it stands out:
① Permanent
Laser engraving creates a permanent mark directly on the AirPods case. The result looks elegant, professional, and durable.
2. High precision for small devices
AirPods are compact, so precision is crucial. Laser engraving can clearly engrave fine text, intricate logos, and detailed graphics. This makes it ideal for personal engravings (such as names or initials) as well as professional branding.
③ Safe and contactless
The engraving process uses a controlled laser beam, so there is no physical pressure or risk of scratches. The laser only engraves the surface, leaving the device fully functional and intact.
4. Fast and adaptable
With the right machine, engraving an AirPods case takes only a few minutes. You can upload your artwork, text, or logos to the software, adjust the position, and let the laser do the rest.
Case study: Laser engraving AirPods in 5 steps 💡
Preparation list for AirPods laser engraving:
- Engraving material: AirPods
- Engraving machine: Diode laser engraver
- AirPods engraving ideas: name, logo, images, patterns, emojis, initials, numbers and dates, etc.
Can you engrave AirPods? Yes! The process is simple. How long does it take to engrave AirPods? Don't worry – just follow these 5 easy steps to get your AirPods laser-engraved in just a few hours!
Step 1: Prepare the design
Start with the artwork, logo, or text you want to engrave. Use vector files (such as SVG or AI) for the cleanest results, although most engraving software also supports images and text. Fine lines and high-contrast designs work best on anodized aluminum.
Step 2: Selecting the right laser engraving machine for AirPods
We recommend the LaserPecker 4 (LP4) , equipped with a 10W 450nm diode, a 2W 1064nm IR laser and a speed of up to 4,000 mm/s – ideal for AirPods engraving.
Step 3: Position and secure the AirPods
Place the AirPods in the engraving machine and ensure they are correctly aligned. Use protective tape or holders if needed to prevent slippage. Check the alignment to ensure your design appears exactly where you want it.
Step 4: Setting up the laser engraving machine
Use the LaserPecker Design App/Software or third-party software such as Photoshop to create or import your desired design. Pay attention to size, shape, and details.
You can also visit LaserPecker CraftZone for inspiration or to purchase files online.
Now it's time to set the parameters of the laser engraving machine.
First: Make sure your engraver is switched on and connect it to your computer or mobile device via the appropriate interface (WiFi, USB, Bluetooth, etc.).
Second: Open the LaserPecker Design Space and upload your design (formats such as JPG/PNG/G-code/SVG etc. are supported).
Third: Place the AirPods in the designated work area, activate preview mode, and ensure the laser is correctly focused.
Fourth: Check that your design fits correctly on the AirPods surface. Adjust the size and position if necessary.

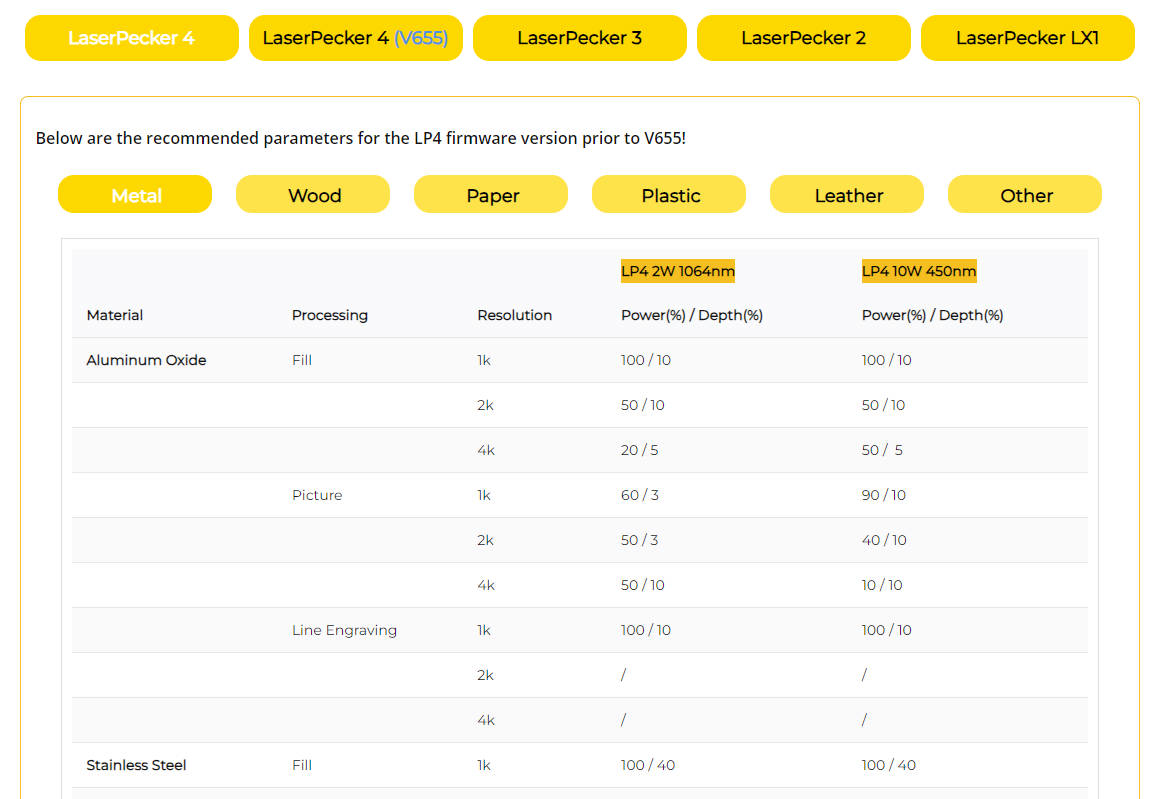
Finally: Adjust the laser parameters such as power, speed, and resolution according to the characteristics of the AirPods and the complexity of the design. Question: "How much laser power is needed for AirPods?" Don't worry, we have the recommended values:
For best results with AirPods, the LaserPecker LP5 is recommended with the following settings: 2 W 1064 nm IR laser; Resolution: 2k; Power: 100%; Depth: 8%; Pass-through: 1.
When operating the laser engraving machine, it is advisable to wear safety glasses or use a laser safety cover to protect the eyes and body, as the blue laser poses risks.
Also, be aware that engraving can produce smoke or toxic fumes. Wearing a mask or using an air purifier is important for safety reasons.
Further recommended LaserPecker engraving and cutting parameters for all LaserPecker machines (LP1, LP2, LP3, LP4 and LP5) can be found in the corresponding table.
Step 5: Start engraving your AirPods now
Double-check everything to avoid mistakes. Then press the start button and watch as the laser brings your design to life. Keep an eye on the process, and you're done!
Once the engraving is complete, gently wipe the case with a soft cloth to remove any residue. Check that all details are clear and even. Your AirPods are now uniquely personalized!

Part 4: Safety & Tips for AirPods Engraving
Laser engraving on AirPods is safe when done correctly. However, since these are small, delicate devices, taking a few precautions will ensure the best results without damage.
1. Protect your AirPods
- Engrave only the AirPods case, not the earbuds or charging ports.
- Always check the position of your design before starting the laser.
2. Use the correct machine settings
- Select presets for plastic surfaces.
- Avoid excessive power, as the case may burn or deform.
3. Practical tips for best results
- Choose designs with high contrast for a clean result.
- Keep the design within safe engraving zones (away from the Apple logo, buttons, or ports).
- For multiple AirPods cases, use a repeatable setup to ensure consistency.
Conclusion
Laser engraving transforms your AirPods from a standard device into a personalized, stylish accessory. From intricate logos to simple initials, a precision laser can securely and permanently engrave your design onto the AirPods case.
With the right steps, the appropriate machine, and adherence to safety guidelines, anyone can create a professional engraving. Whether for yourself or as a gift – AirPods with an engraving are truly unique.


