


"Has anyone ever engraved a golf club before?"
Personalized golf clubs are special tools that golfers use to hit the golf ball. They mainly consist of a shaft, grip, and clubhead. When it comes to laser engraving golf clubs, many specifically refer to laser engraving the clubhead.
In this guide, we'll take a closer look at customized golf clubs. We'll explain how it works, what benefits it offers, and guide you step-by-step through the process of getting your own golf club engraved. Whether it's marking golf clubs with a laser, a custom laser engraving, or an individual engraving on golf clubs – we'll show you how to personalize and make your golf club unique.
Let's dive together into this exciting world of golf club engraving!

In this article:
Part 1: What is golf club laser engraving and what machine is needed?
1.1 How does laser engraving work on golf clubs and clubheads?
As mentioned, golf club laser engraving most often refers to laser engraving the clubhead. Clubheads are typically made of stainless steel, titanium, or aluminum alloys. These materials offer high strength, durability, and optimal control, making them ideal for various types of golf clubs.
Laser engraving on golf clubs, a special form of metal engraving, is performed with a high-power laser. The laser beam emits an enormous amount of energy, creating local heating and vaporization of the surface. This allows text, images, and patterns to be created on golf clubs with laser engraving.

(Text with laser engraving on stainless steel golf clubs)

Source: Photo with laser engraving on stainless steel golf clubs
1.2 Which machine is suitable for laser engraving on golf clubs?
To engrave a golf club, a suitable laser engraver is needed. This tool is essential as it simplifies the engraving process and ensures precise and durable results.
Since there are a variety of laser engraving machines for golf clubs, many ask themselves: Which laser is best for engraving stainless steel? Or which machine do I need to engrave stainless steel?
For home use or smaller engraving projects, diode lasers are an excellent choice. If you value mobility, ease of use, and cost savings when engraving golf clubs, a diode laser is the best option.

Practical example: Laser engraving on stainless steel golf clubs in 5 steps 🔨
Preparation list for golf club laser engraving:
- Engraving material: Stainless steel golf clubhead
- Laser engraving machine: Laser engraver
- Engraving design: Text, logos, images, patterns, etc.
Is laser engraving on golf clubs complicated? No! The process is quite simple. But how do you engrave a golf club? Don't worry – just follow these 5 steps to personalize your golf clubs with laser engraving.
Step 1: Choose the right material – stainless steel golf clubhead
Choosing the right material is crucial for customized laser engraving on golf clubs. Different materials require specific laser settings to ensure precise engraving. It is also important that the material is suitable for lasers to avoid safety risks.

Choosing the right material is crucial for customized laser engraving on golf clubs. Different materials require specific laser settings to ensure precise engraving. It is also important that the material is suitable for lasers to avoid safety risks.

Step 2: Choose the right laser engraving machine for golf clubs
For this engraving, we use the LaserPecker 4 (LP4), – a high-precision dual-laser, ideal for laser engraving on stainless steel golf clubs.
*Alternative:
If you want faster engraving speed and even better results on the golf clubhead, a more powerful laser like the LP5 is a good choice.

Step 3: Prepare the engraving design
Use free graphic software to create or import your desired motif. Pay attention to the size, shape, and details like text or patterns so that your individual engraving on golf clubs is perfectly showcased.

Step 4: Set up the laser engraving machine for stainless steel
First, make sure your laser engraver is turned on. Then connect it to your computer or mobile device via the appropriate interface (USB cable, Bluetooth, etc.).

Next: Open the graphic software and load your design.
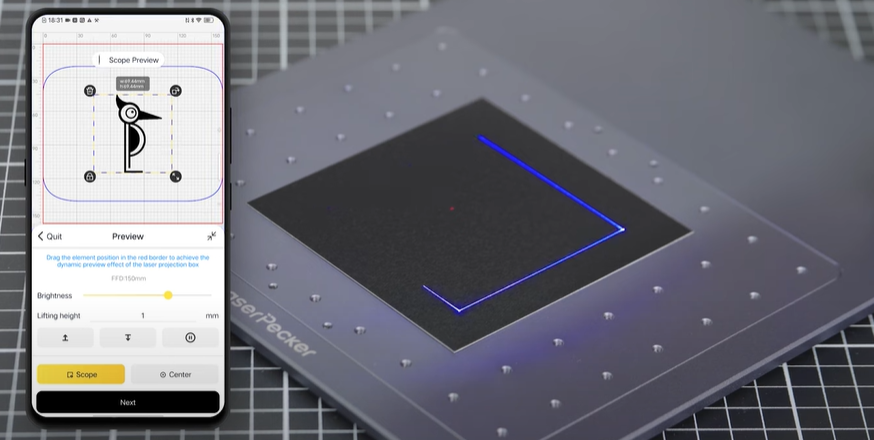
Activate preview mode to check if the laser lens is correctly focused. There are two methods for this:
Method 1: If you are using the LaserPecker 4 (LP4), measure the distance between the surface of the golf club and the machine with a ruler. The recommended distance is 15 cm or 150 mm.
Method 2: Alternatively, you can use the two red dots projected by the laser. If they overlap, the laser engraving on the golf club is optimally focused.

Place the golf club within the marked work area and check the design. If it is not correctly aligned, adjust the position and size so that it hits exactly the desired area.
Open the laser settings in the software and adjust parameters such as power, speed, and resolution. If you are wondering:
"How much laser power do you need to engrave a golf club?" – Here are the recommended settings for the LaserPecker 4 on stainless steel golf clubheads: Laser power: 2 W, 1064 nm, Resolution: 8K, Power: 100%, Depth: 100%, Passes: 1, Dithering mode
Further recommended laser engraving settings for golf clubs (also for LP1, LP2, LP3, LP4 and LP5) can be found in the corresponding parameter table.

Step 5: Start laser engraving on golf clubs now
Carefully check all settings to avoid errors. Once everything is correctly set, press the start button – and the golf club laser engraving begins! The laser precisely applies your individual design to the surface. Observe the process to ensure that everything goes as desired.
Safety first!
If you are engraving with a 450 nm blue laser, always wear safety glasses or use a laser safety cover to protect your eyes and yourself.
Watch out for smoke development!
During laser engraving on golf clubs, smoke or even toxic gas can be released. Wear a mask or use an air purifier to protect yourself.

If you want to learn more about using the LaserPecker LP4 machine, check out the LaserPecker user manual on our website!
Conclusion
This guide shows you step-by-step how to personalize a golf club with engraving. Let yourself be inspired and discover the many possibilities of customized laser engraving on golf clubs!


