


Clothing has always been a way to express personality, creativity, and style. While traditional methods like embroidery, printing, or sewing have long been used to personalize garments, laser engraving is increasingly establishing itself as a modern, precise, and versatile alternative. By allowing fashion brands to add unique patterns and hobbyists to personalize jackets, jeans, or leather accessories, this technique opens up endless creative possibilities.
In this guide, we walk you through the basics of laser engraving on fabric – what it is, how it engraves, which laser engravers to choose, and safety instructions. We also explore why this method is becoming increasingly popular and offer a simple step-by-step guide that beginners can easily learn.

This article contains:
- Part 1: Introduction to laser engraving on fabric
- 1.1 What is laser engraving on fabric?
- 1.2 How is laser engraving done on fabric?
- 1.3 Which laser engraver is best suited for fabric?
- 1.4 Tips for laser processing of fabric
- Part 2: Why use laser engraving for fabric?
- Practical example: Laser engraving on fabric in 5 steps
Part 1: Introduction to laser engraving on fabric
1.1 What is laser engraving on fabric?
Laser engraving on fabric is a modern technique that uses a concentrated laser beam to etch or mark designs directly onto fabric. Unlike traditional printing or embroidery methods, laser engraving requires neither ink, thread, nor physical contact with the material. Instead, the laser removes or alters the top layer of the material to create permanent patterns, logos, or textures.
This technique is widely used in the fields of fashion, sportswear, denim and even leather goods to add creative designs or brand details.

1.2 How is laser engraving done on fabric?
This process is achieved by refracting a focused laser beam onto the fabric surface. Depending on the material type, the laser can change the color of the fibers, remove the surface layer, or create texture.
On denim, for example, the laser bleaches the surface to achieve a "washed" effect, while on leather it can etch deep, distinct patterns. By adjusting the laser power, engraving speed, and focal length, designers can create both delicate structures and bold, high-contrast patterns.

1.3 Which laser engraver is best suited for fabric?
The most commonly used machines for engraving clothing are diode laser engravers , as they work excellently with organic materials such as cotton, denim and leather.
For home use or simple fabric engraving , diode laser engravers like the LP5 , LP4 , or even LP2 are a recommended choice. These fabric laser engravers are both easy to use and budget-friendly.

1.4 Safety instructions for laser processing of fabric
Safety is always the top priority when working with lasers and textiles.
- Adequate ventilation: Always ensure good ventilation, as some materials (especially synthetics) can release fumes during engraving.
- Material check: Always test a small fabric sample – some materials can unexpectedly discolor or burn.
- Fire safety: Keep a fire extinguisher handy, as materials are flammable when overheated.
Part 2: Why use laser engraving for fabric?
Laser engraving has become the preferred process in the fashion industry due to its combination of creativity, efficiency, and durability. Unlike traditional decoration methods, it offers unique advantages that set it apart.
1 Precision and detail
Laser engraving enables a level of detail that is virtually impossible to achieve with embroidery or printing. Whether it's complex logos or intricate patterns, the laser consistently reproduces clear lines and textures, ensuring uniform quality.
2. Shelf life
This method is particularly suitable for frequently washed clothing because the design is engraved directly into the fabric surface and therefore won't peel, tear, or fade – unlike screen printing or transfer printing. It is therefore ideal for sportswear, denim, or uniforms.

③ Suitability for various materials
Laser technology can be applied to a wide variety of fabrics, including denim, cotton, polyester, leather, and even blends. Designers can achieve diverse effects tailored to different textiles, such as faded textures on jeans or crisp patterns on leather jackets.
4. Speed and efficiency
Once the design is uploaded, the laser engraving machine executes the engraving process quickly, precisely, and reproducibly. This ensures consistently high quality, from individual one-off pieces to large-scale production runs.
Practical example: Laser engraving on fabric in 5 steps
Preparation for laser engraving on clothing:
- Engraving material: Clothing
- Engraving machine: diode laser engraver
- Engraving design: name, logo, images, patterns, etc.
Can we engrave fabric? Absolutely! The process is very simple. How long does it take to engrave clothing? Don't worry, just follow these 5 easy steps to receive your laser-engraved clothing in minutes!
Step 1: Prepare your design
First, prepare the design, logo, or text you wish to engrave. Vector files (such as SVG or AI formats) produce the clearest results, although most engraving programs also support images and text. Fine lines and high-contrast designs achieve the best effect on anodized aluminum.
Step 2: Choose the best laser engraving machine for fabric
We recommend the LaserPecker 4 (LP4) , which is equipped with a 10W 450nm diode laser, a 2W 1064nm IR laser and a speed of up to 4,000 mm/s, offering excellent performance for engraving clothing.
Step 3: Holds the fabric in the appropriate place
Lay the garment flat on the engraving table, ensuring it is free of creases. If necessary, secure it with weights, tape, or clamps to prevent slipping. A perfectly flat engraving surface is essential for consistent engraving depth and precision.
Step 4: Setting up the fabric laser engraving machine
Use the LaserPecker pattern design application/software or a third-party graphic design tool (e.g., Photoshop) to create or import the shape or design you wish to engrave onto the garment's surface. Design the dimensions, shape, and other details.
*You can also visit LaserPecker CraftZone for inspiration or to purchase files online. Now it's time to set the parameters of the laser engraving machine.
1. First, make sure your engraver is switched on, and then connect your laser engraver to your computer or mobile device via the appropriate interface (WiFi, USB, Bluetooth, etc.).
2. Next, open the LaserPecker Design Space and upload your design. (Formats such as JPG/PNG/G-code/SVG etc. are supported.)
3. Place the items in the designated work area, activate preview mode, and ensure the laser is properly focused.
4. Check if your design fits correctly on the surface of the garment. If not, adjust the size and position to the dimensions of the material.

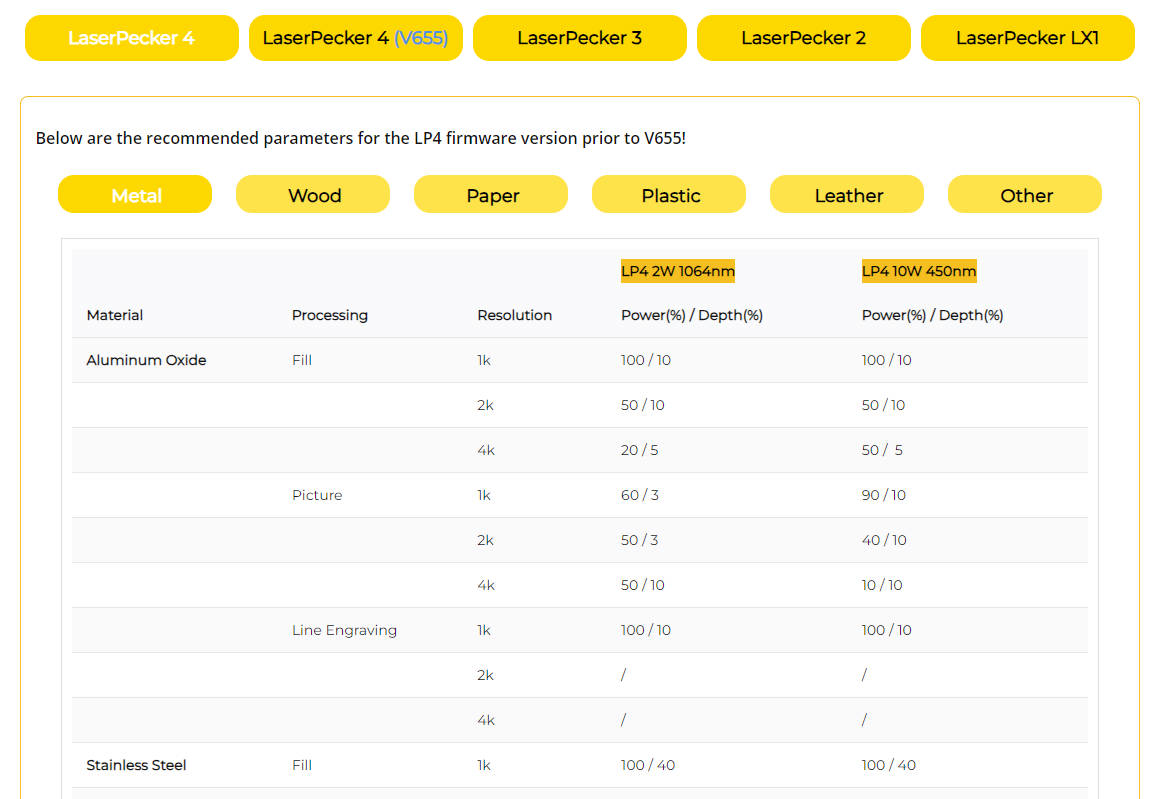
5. Finally, access the laser settings in the software and adjust parameters such as power, speed, and resolution according to the garment material and the complexity of the design. You might be wondering, "What laser power is needed for engraving clothing?" Don't worry, we've got you covered!
The recommended parameters for engraving clothing with the Laserpecker LP5 are: 10W 450nm diode laser; Resolution: 4k; Power: 40%; Engraving depth: 40%; Number of engravings: 1;
When operating the laser engraver, it is advisable to wear safety glasses or use a laser safety shield to protect your eyes and body from possible damage, as lasers pose safety risks.
Please note that laser engraving can produce smoke or toxic fumes. Wearing a respirator or using an air purifier is essential for safety.
Further recommendations regarding Laserpecker's laser engraving parameters can be found in the parameter table, which applies to all Laserpecker models, including LP1, LP2, LP3, LP4 and LP5.
Step 5: Engrave your clothes now
Double-check everything to avoid mistakes. Then press the start button and watch the magic happen. Let the laser bring your design to life. Keep an eye on it, and you're all set!
Once the engraving is complete, carefully remove the garment from the machine. Remove any residue or fibers with a brush and check the clarity and consistency of the engraved design. For denim or leather, gently wiping with a damp cloth can enhance the effect.
Conclusion
Laser engraving offers a new level of personalization for clothing, combining precision, durability, and creativity in one process. Whether you're a beginner experimenting with custom T-shirts at home or a small business owner looking for a unique branded device, this method delivers professional results with minimal effort.
By understanding the process, selecting the right machine, and following best practices, you can transform ordinary garments into statement pieces that stand out. With laser engraving, the possibilities for fashion, design, and personal expression are virtually limitless.


